Changing DNS has many benefits. If you’ve never changed your computer’s DNS servers, you’re probably using those of your ISP (Internet Service Provider). And yet, changing DNS can improve your privacy, security, and sometimes even the loading of web pages. In this article we explain how change DNS servers of your network card in windows, macos AND linux. Follow the leader !
What is DNS? What is it for?
DNS (Domain Name System, or Domain Name System in French) is a system that allows you translate domain names to IP addresses. In other words, it links the web addresses we enter (like google.com) with the IP addresses (like 172.217.169.3) that computers use to connect to servers on the Internet. DNS can be compared to a gigantic directory that groups domain names with their IP addresses.
DNS makes it much easier to navigate the web because we don’t need to memorize those complex strings of numbers. All you have to do is type the name of a site and DNS takes care of finding the corresponding IP address, allowing the browser to locate the server and display the site.
In addition to this translation function, DNS also distributes the load among multiple servers, ensuring the availability and speed of websites. When you enter an address, your browser sends a query to the DNS server which, if it can’t find the cached address, contacts other servers to get the information. This makes the process transparent for the user, who can quickly access the sites without worrying about technical aspects.
Why change your DNS?
There are many reasons why you may want to change the DNS on your computer or router. Here are some of them:
- To improve performance : If you are experiencing slow speeds or intermittent connection issues, changing your DNS could help improve performance. Your Internet Service Provider’s DNS server may be overloaded or down, and using a different provider may improve web page loading times.
- To improve security : Some DNS servers offer better security features than others. For example, DNS4EU offers protection against phishing and malicious websites, as well as content filtering options that can block access to inappropriate websites on your network.
- To access censored content : Your Internet Service Provider may censor certain websites, including online download sites. By changing your computer’s DNS, you can bypass this censorship and access blocked websites.
Which DNS resolver to choose?
There are many public DNS servers you can use, such as Cloudflare, GoogleDNS, FDN, or Quad9.
Personally, I use the DNS servers of the FDN (French Data Network), because it is a free and independent DNS provider that respects your privacy. However, you can opt for another DNS provider. You will find the complete list of the best fast and secure DNS servers in our dedicated article.
| Supplier | IPv4 addresses | IPv6 addresses | DNS over HTTPS (DoH) |
|---|---|---|---|
| cloud flare | 1.1.1.1 1.0.0.1 | 2606:4700:4700::1111 2606:4700:4700::1001 | https://cloudflare-dns.com/dns-query |
| DNS4EU | 86.54.11.100 86.54.11.200 | 2a13:1001::86:54:11:100 2a13:1001::86:54:11:200 | https://unfiltered.joindns4.eu/dns-query |
| FDN | 80.67.169.12 80.67.169.40 | 2001:910:800::12 2001:910:800::40 | https://ns0.fdn.fr/dns-query https://ns1.fdn.fr/dns-query |
| quadruple9 | 9.9.9.9 149.112.112.112 | 2620:faith::faith 2620:faith::9 | https://dns.quad9.net/dns-query |
| 8.8.8.8 8.8.4.4 | 2001:4860:4860::8888 2001:4860:4860::8844 | https://dns.google/dns-query |
Change DNS on Windows, macOS or Linux It is relatively simple. DNS must be modified in the TCP/IP properties of your network card. You simply have two addresses to configure, which correspond to those of the primary server and those of the secondary server. Here’s how to do it.
Change DNS in Windows [11, 10, 8, 7, etc.]
To change DNS on Windows, follow these steps:
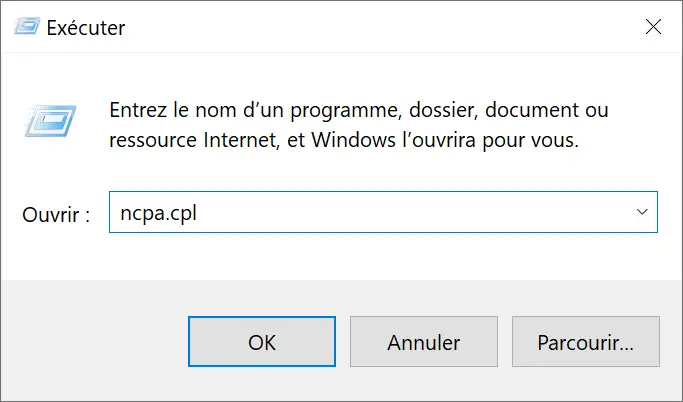
- Press the keys simultaneously windows + R on your keyboard to open the Run dialog box.
- In the Run dialog box, type
ncpa.cpland validate with the key Entrance or click “ Well “.
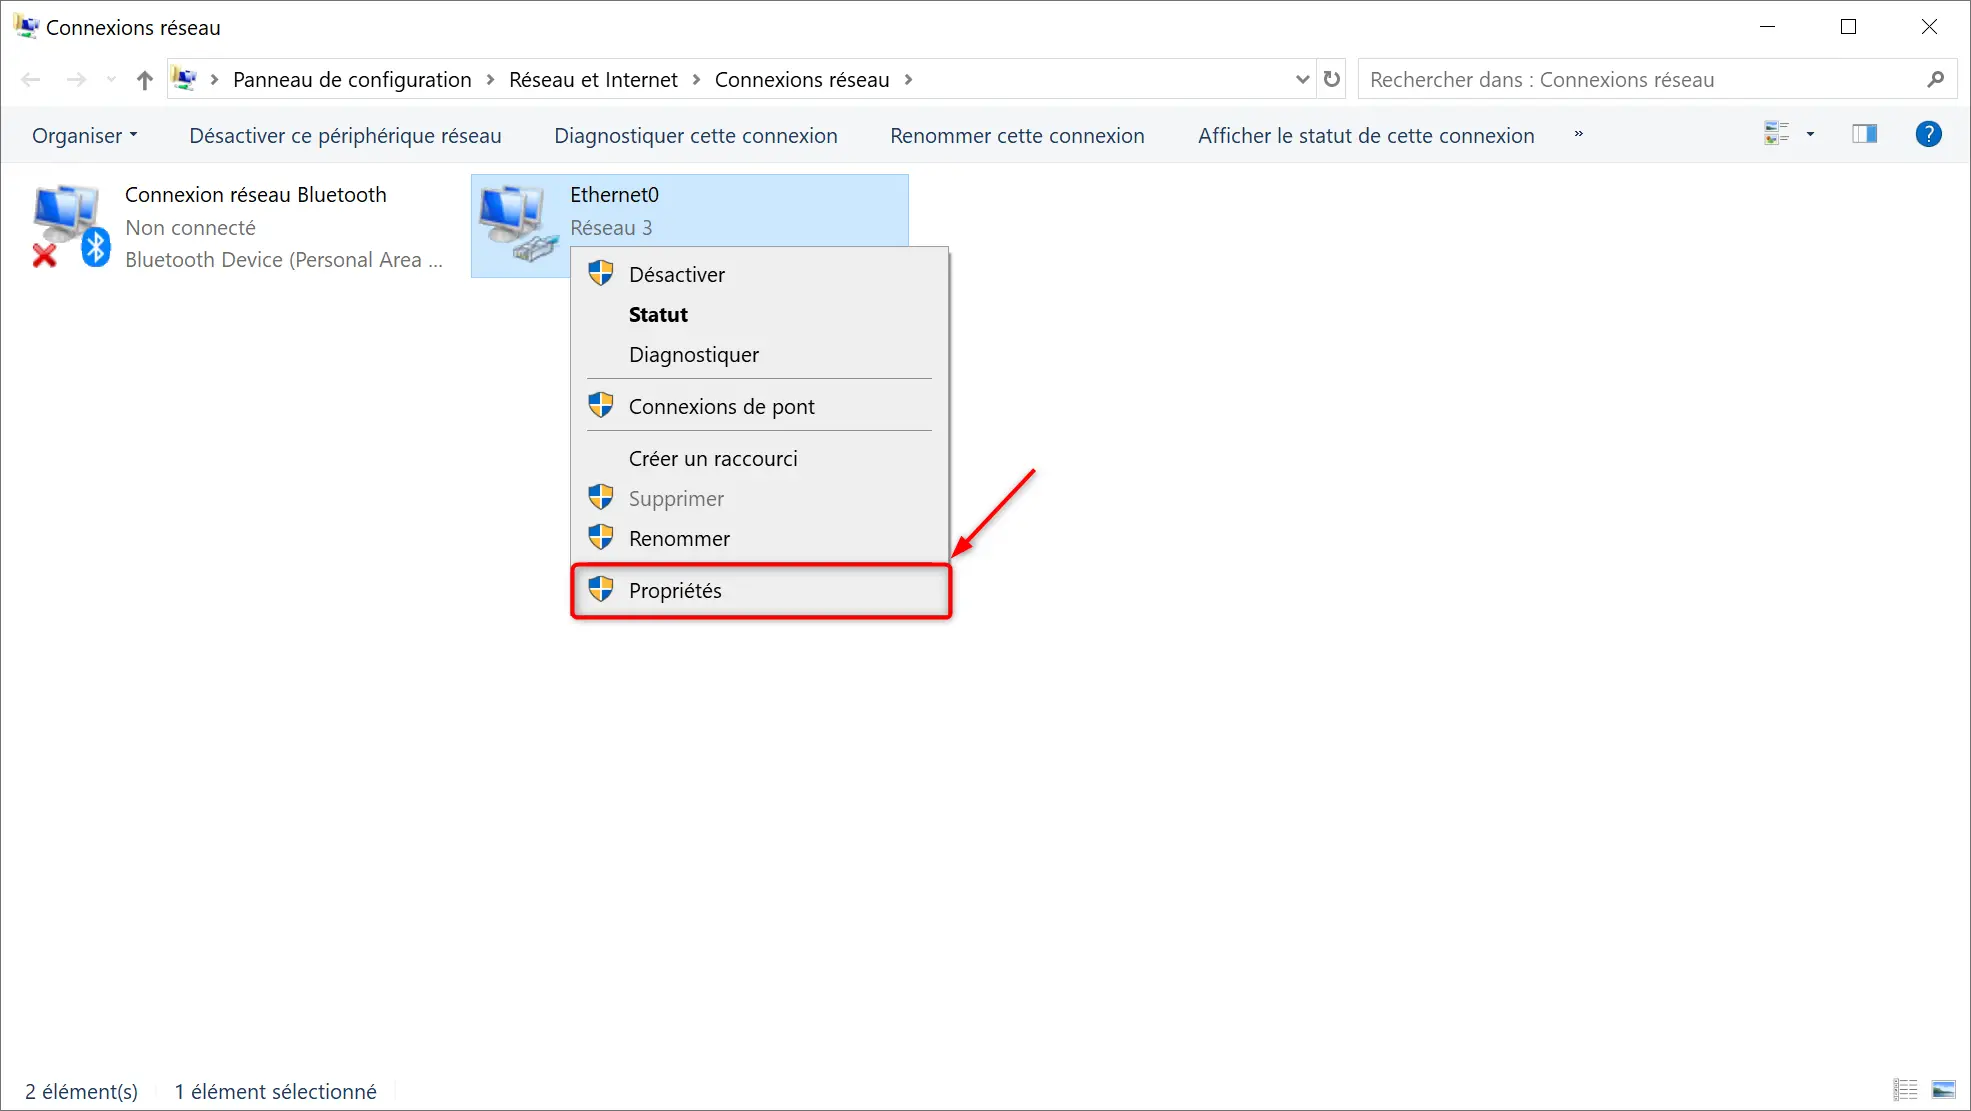
- From the window” Network connections “, right click on the connection you are using (Ethernet or Wi-Fi network) and select ” Properties » in the context menu.
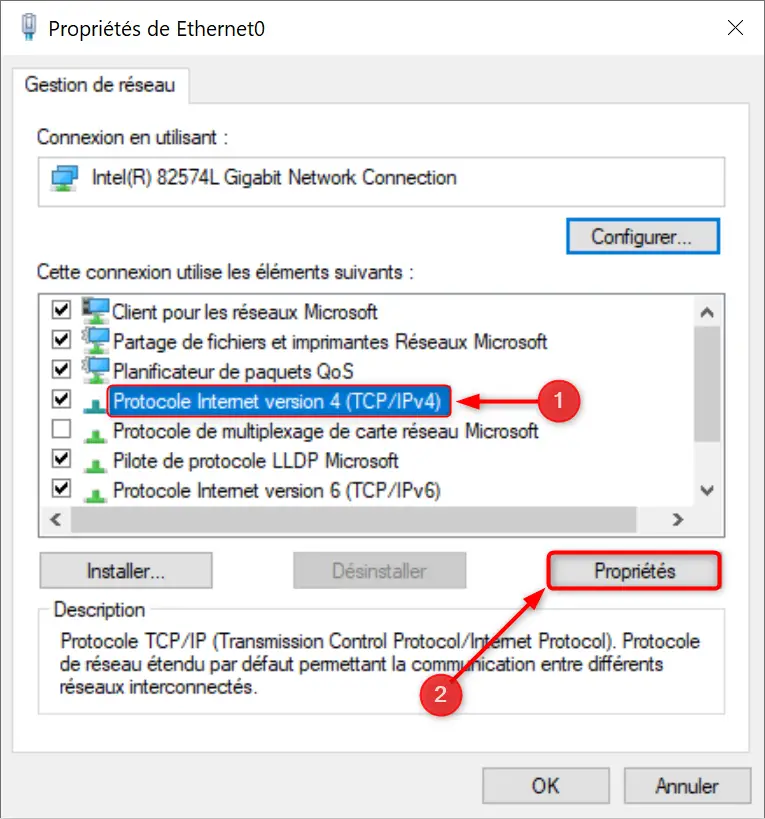
- In it ” Network management », select from the list “ Internet Protocol version 4 (TCP/IPv4) » then click the « button Properties “.
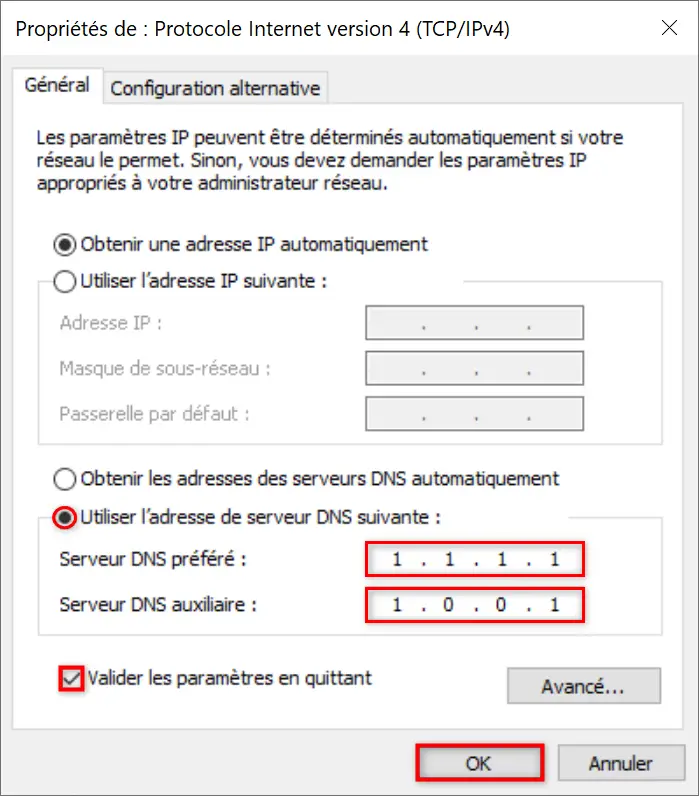
- In the “Properties” window, check the box ” Use the following DNS server address » so you can enter the new DNS manually.
- Enter the DNS servers of your choice, then check the “ Validate configuration on exit » and click “ Well “. For example, to use Cloudflare DNS servers, enter the following IPv4 addresses: 1.1.1.1 AND 1.0.0.1
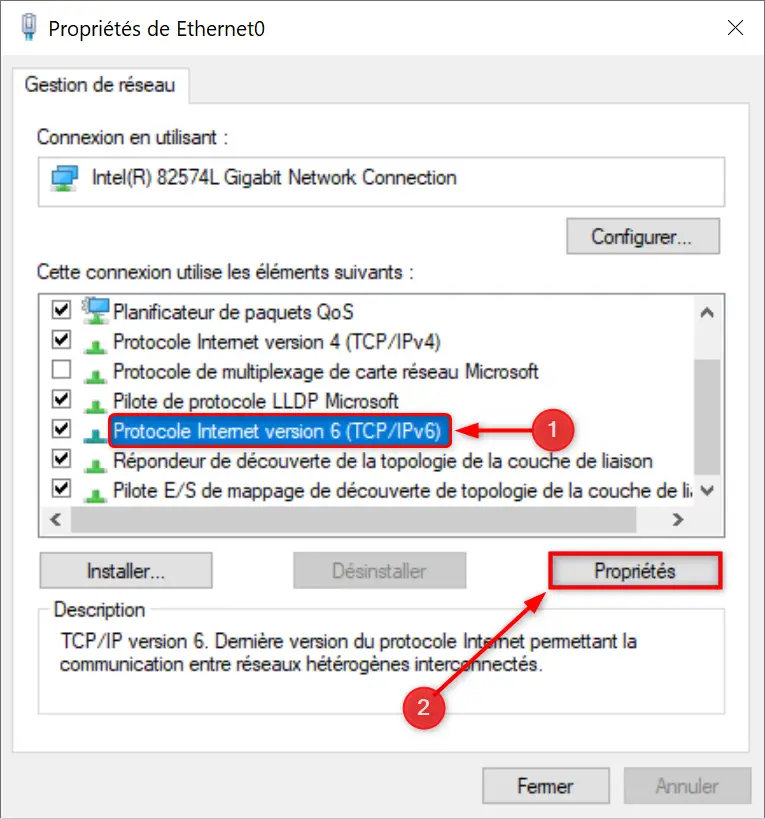
- Repeat these same operations for the IPv6 protocol. To do this, select “ Internet Protocol version 6 (TCP/IPv6) ”, then click “ Properties “.
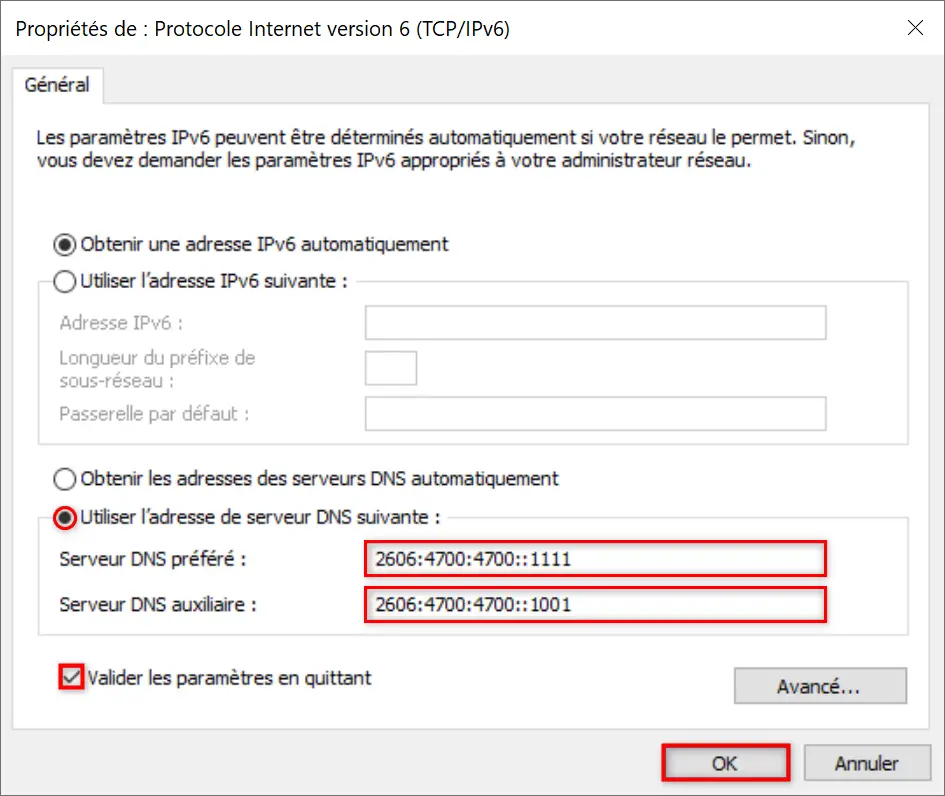
- Check the box “ Use the following DNS server address ”, then fill out the DNS fields manually.
- Enter your IPv6 DNS, then check the “ Validate configuration on exit » and click “ Well “. For example, to use Cloudflare DNS servers, enter the following IPv6 addresses: 2606:4700:4700::1111 AND 2606:4700:4700::1001
✅ Done, now you know how to change DNS easily in Windows 11/10.
Change DNS on macOS
To change the DNS servers on your Mac, follow these steps:
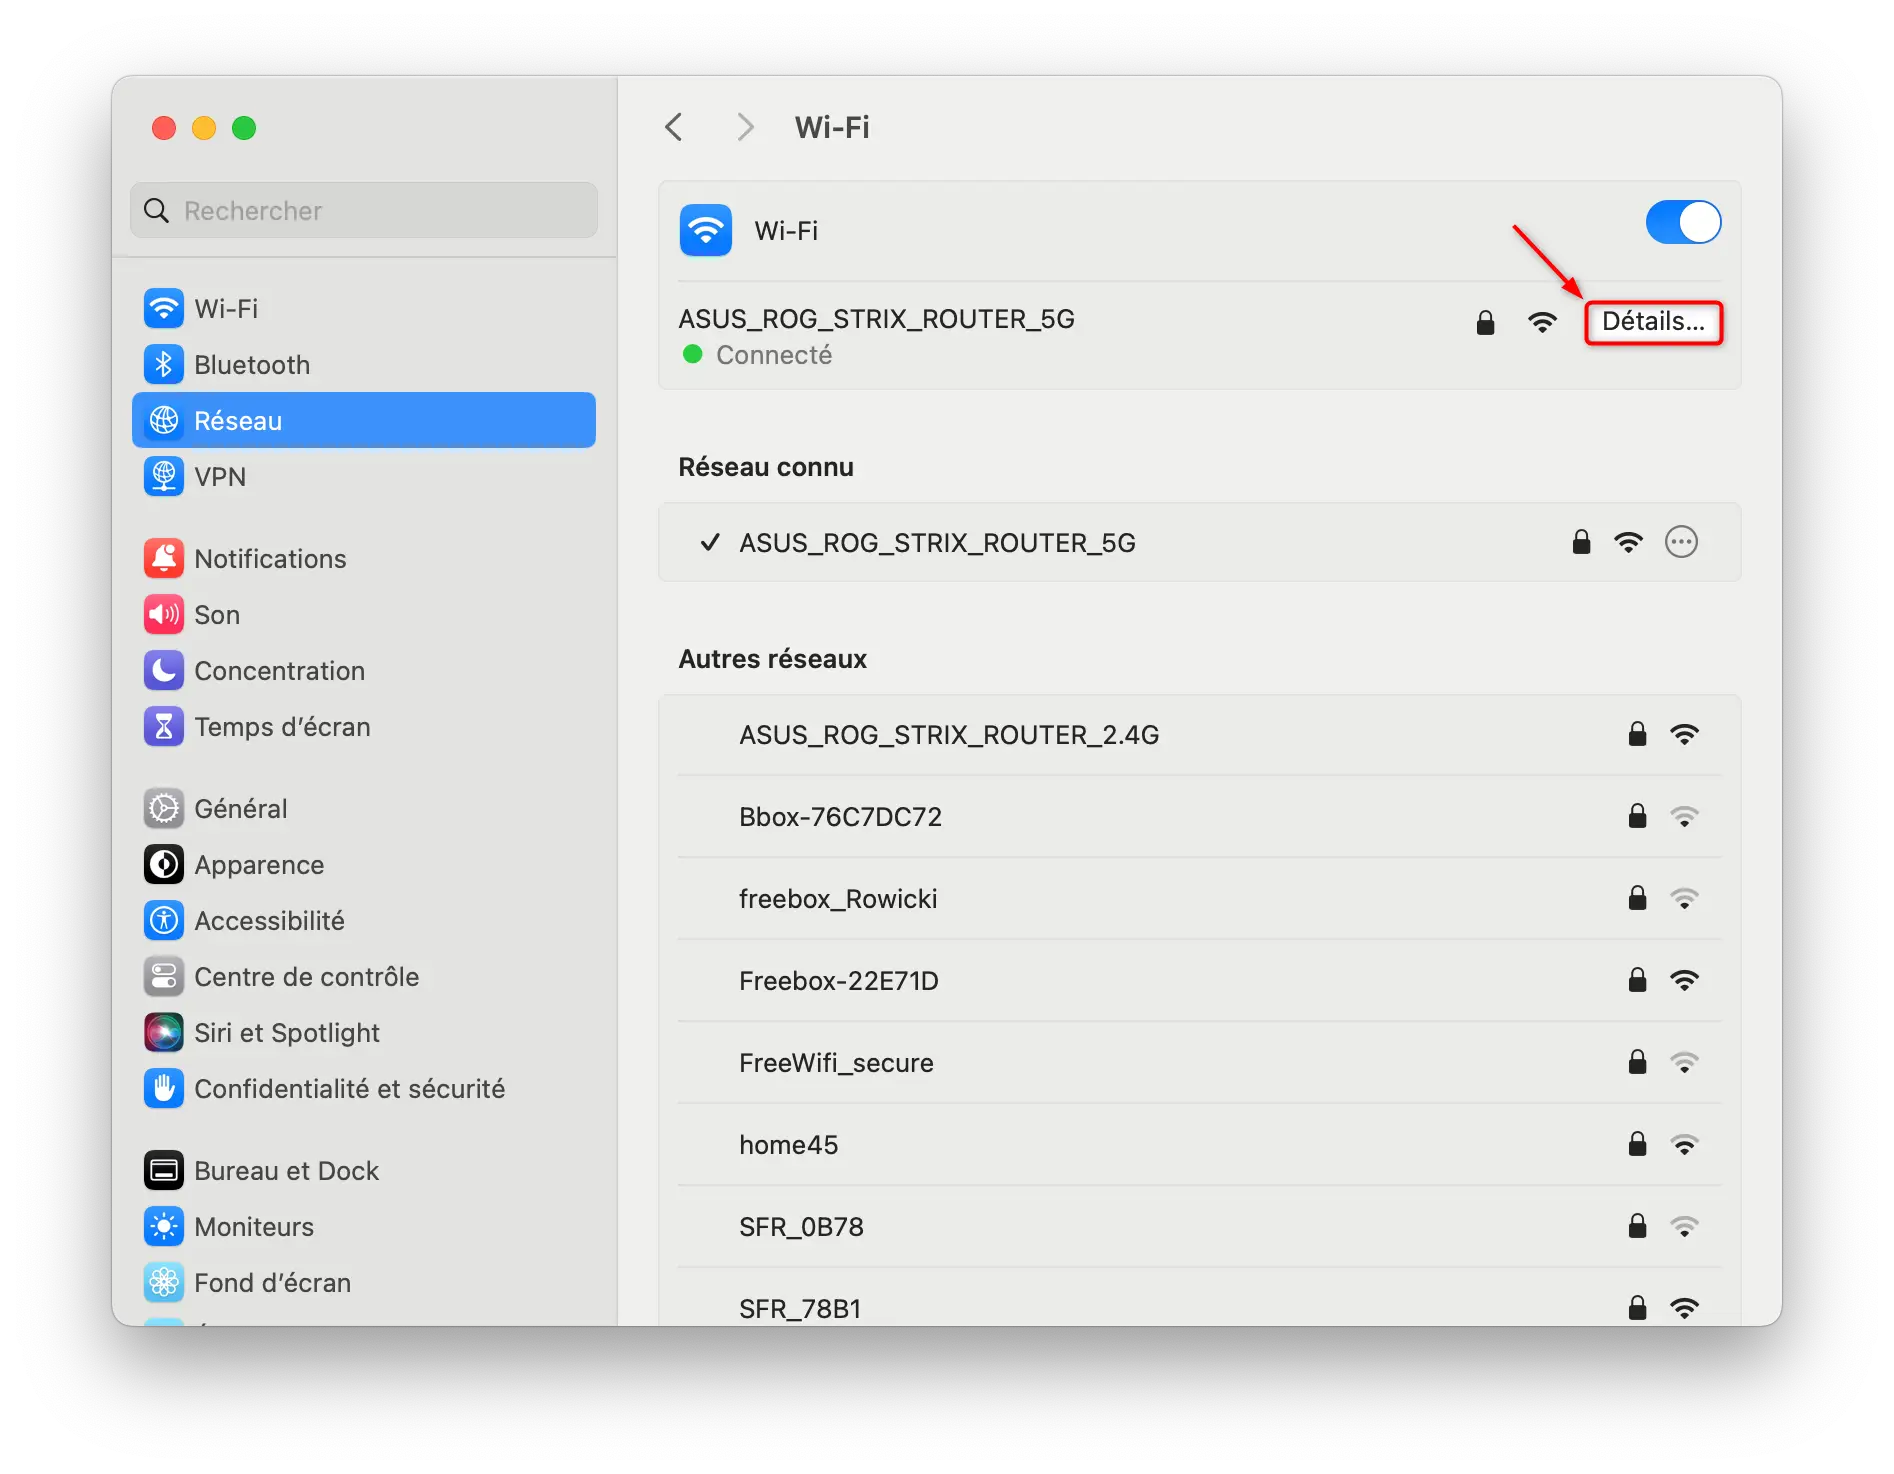
- Go to Apple menu

- Then click “ Grid “, then in ” wifi ” EITHER ” ethernet » (depending on your connection type).

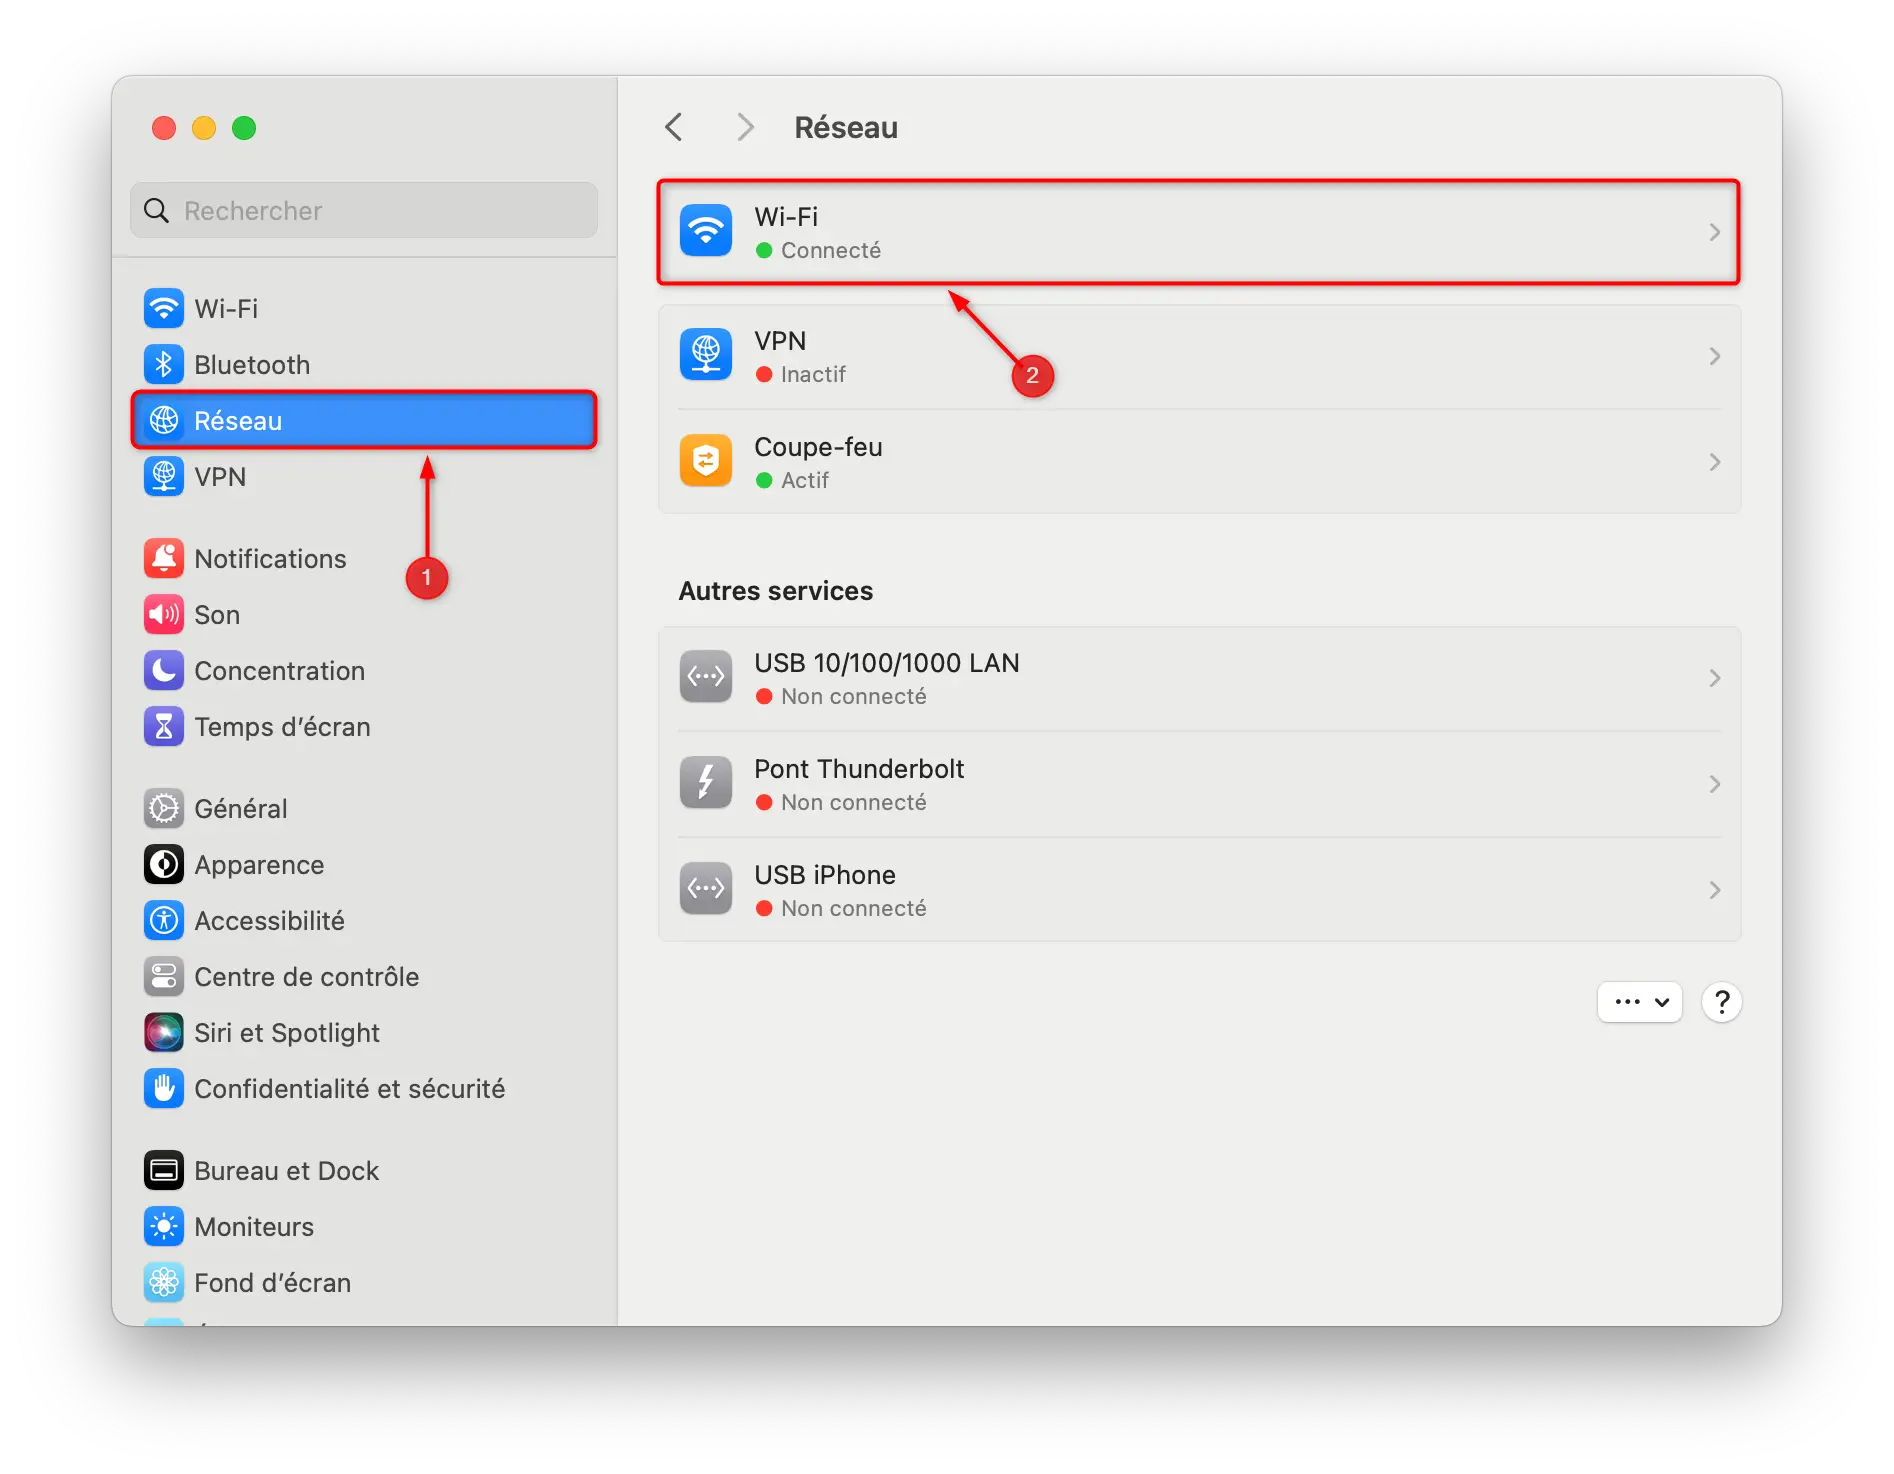
- Then click “ Details… “.
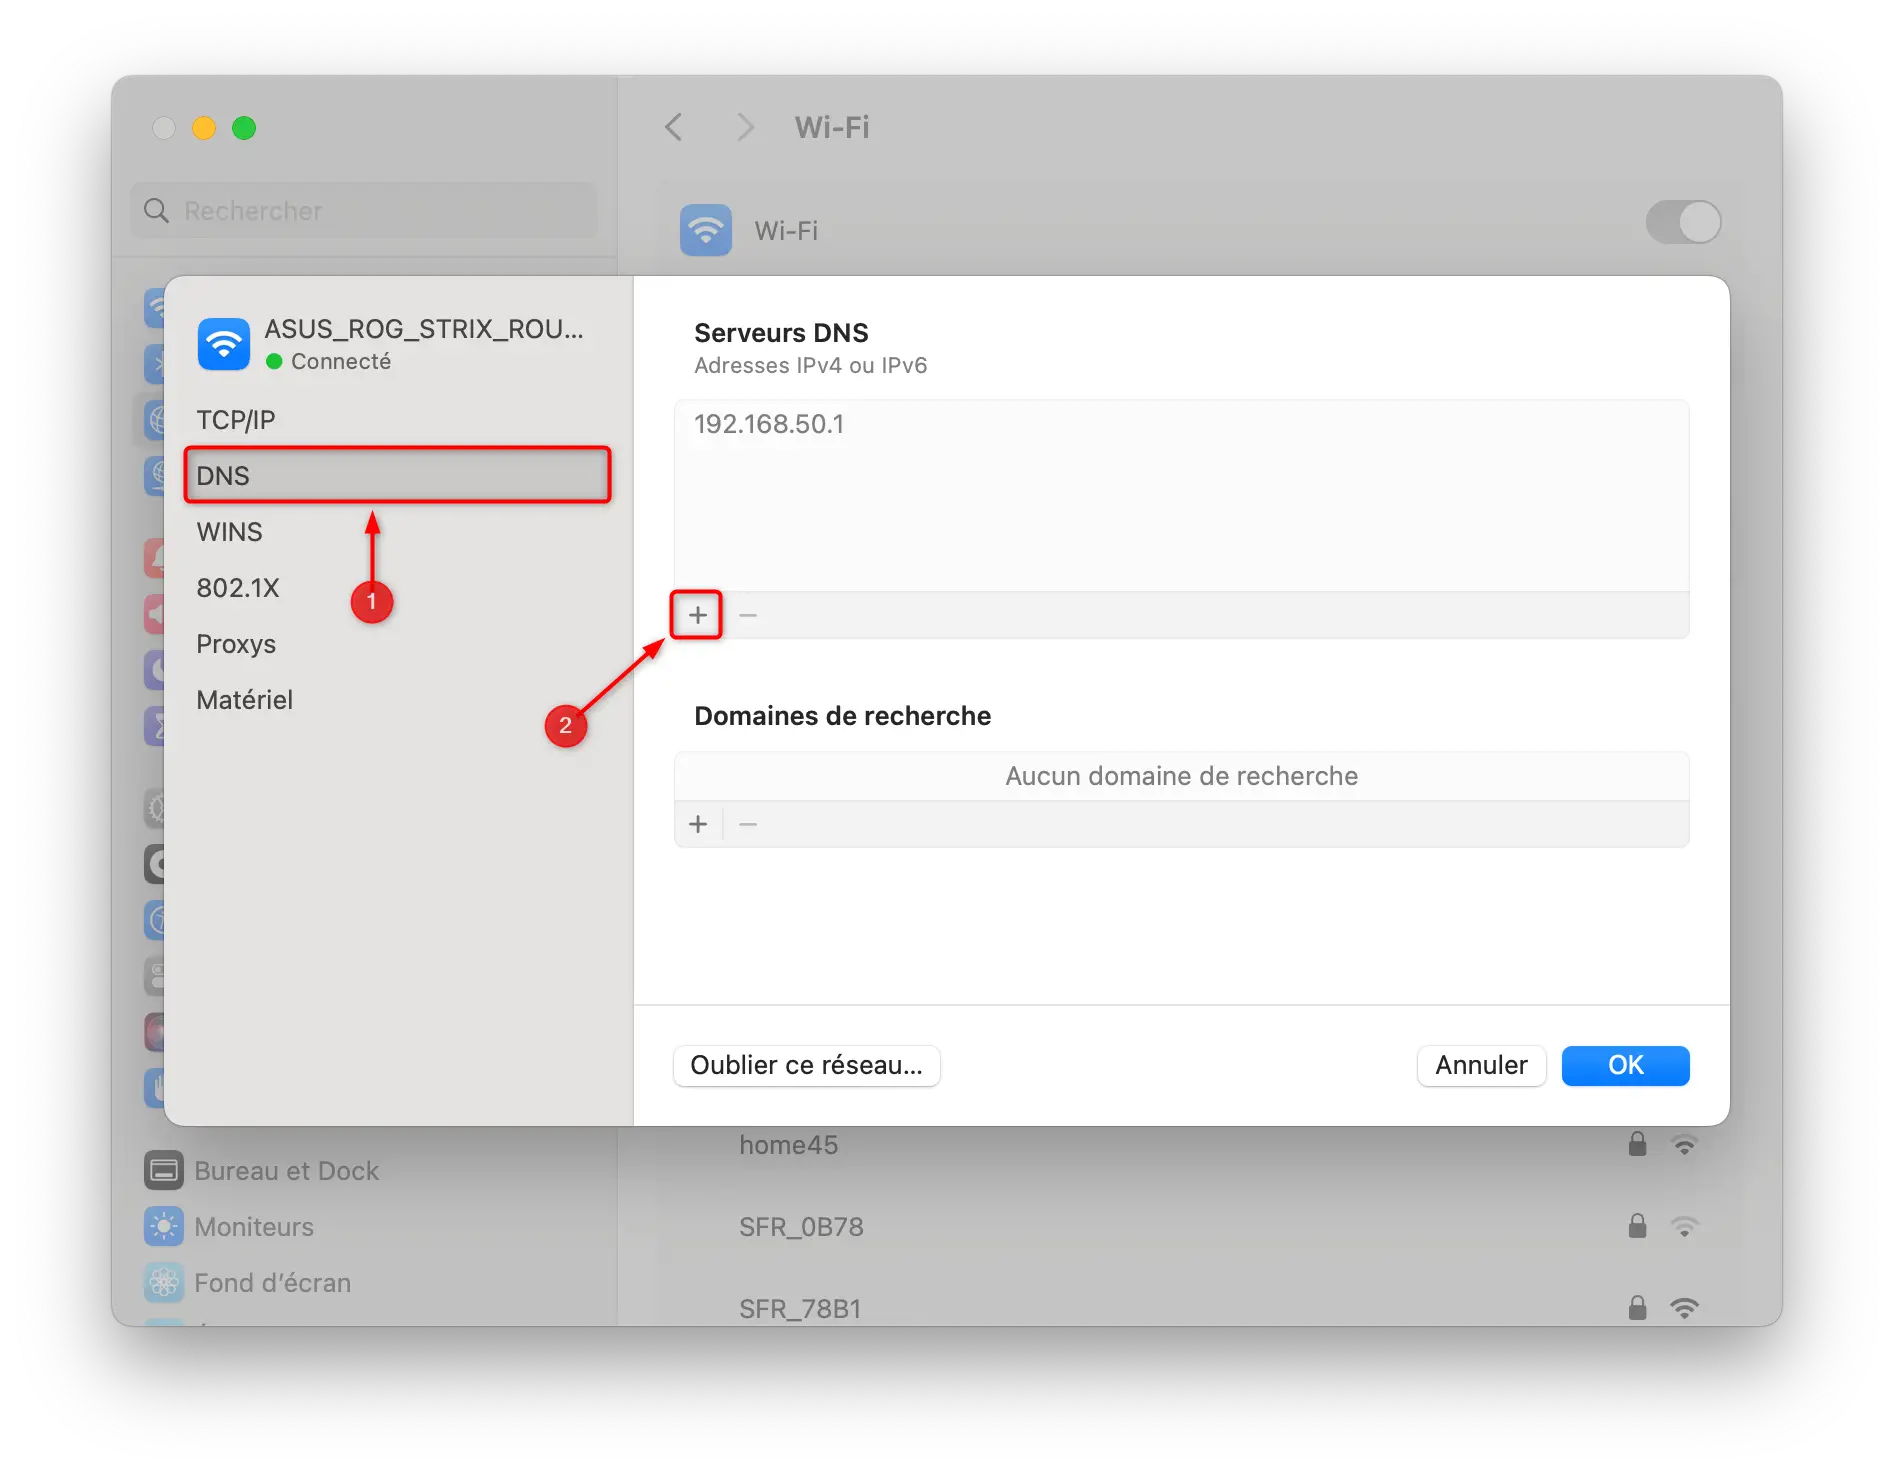
- Go to ” DNS ”, then enter your new DNS addresses using the “ + » (example: 1.1.1.1 and 1.0.0.1 for Cloudflare DNS servers). Then validate with “ Well “.
- Finally, click “ Well » to save the changes.
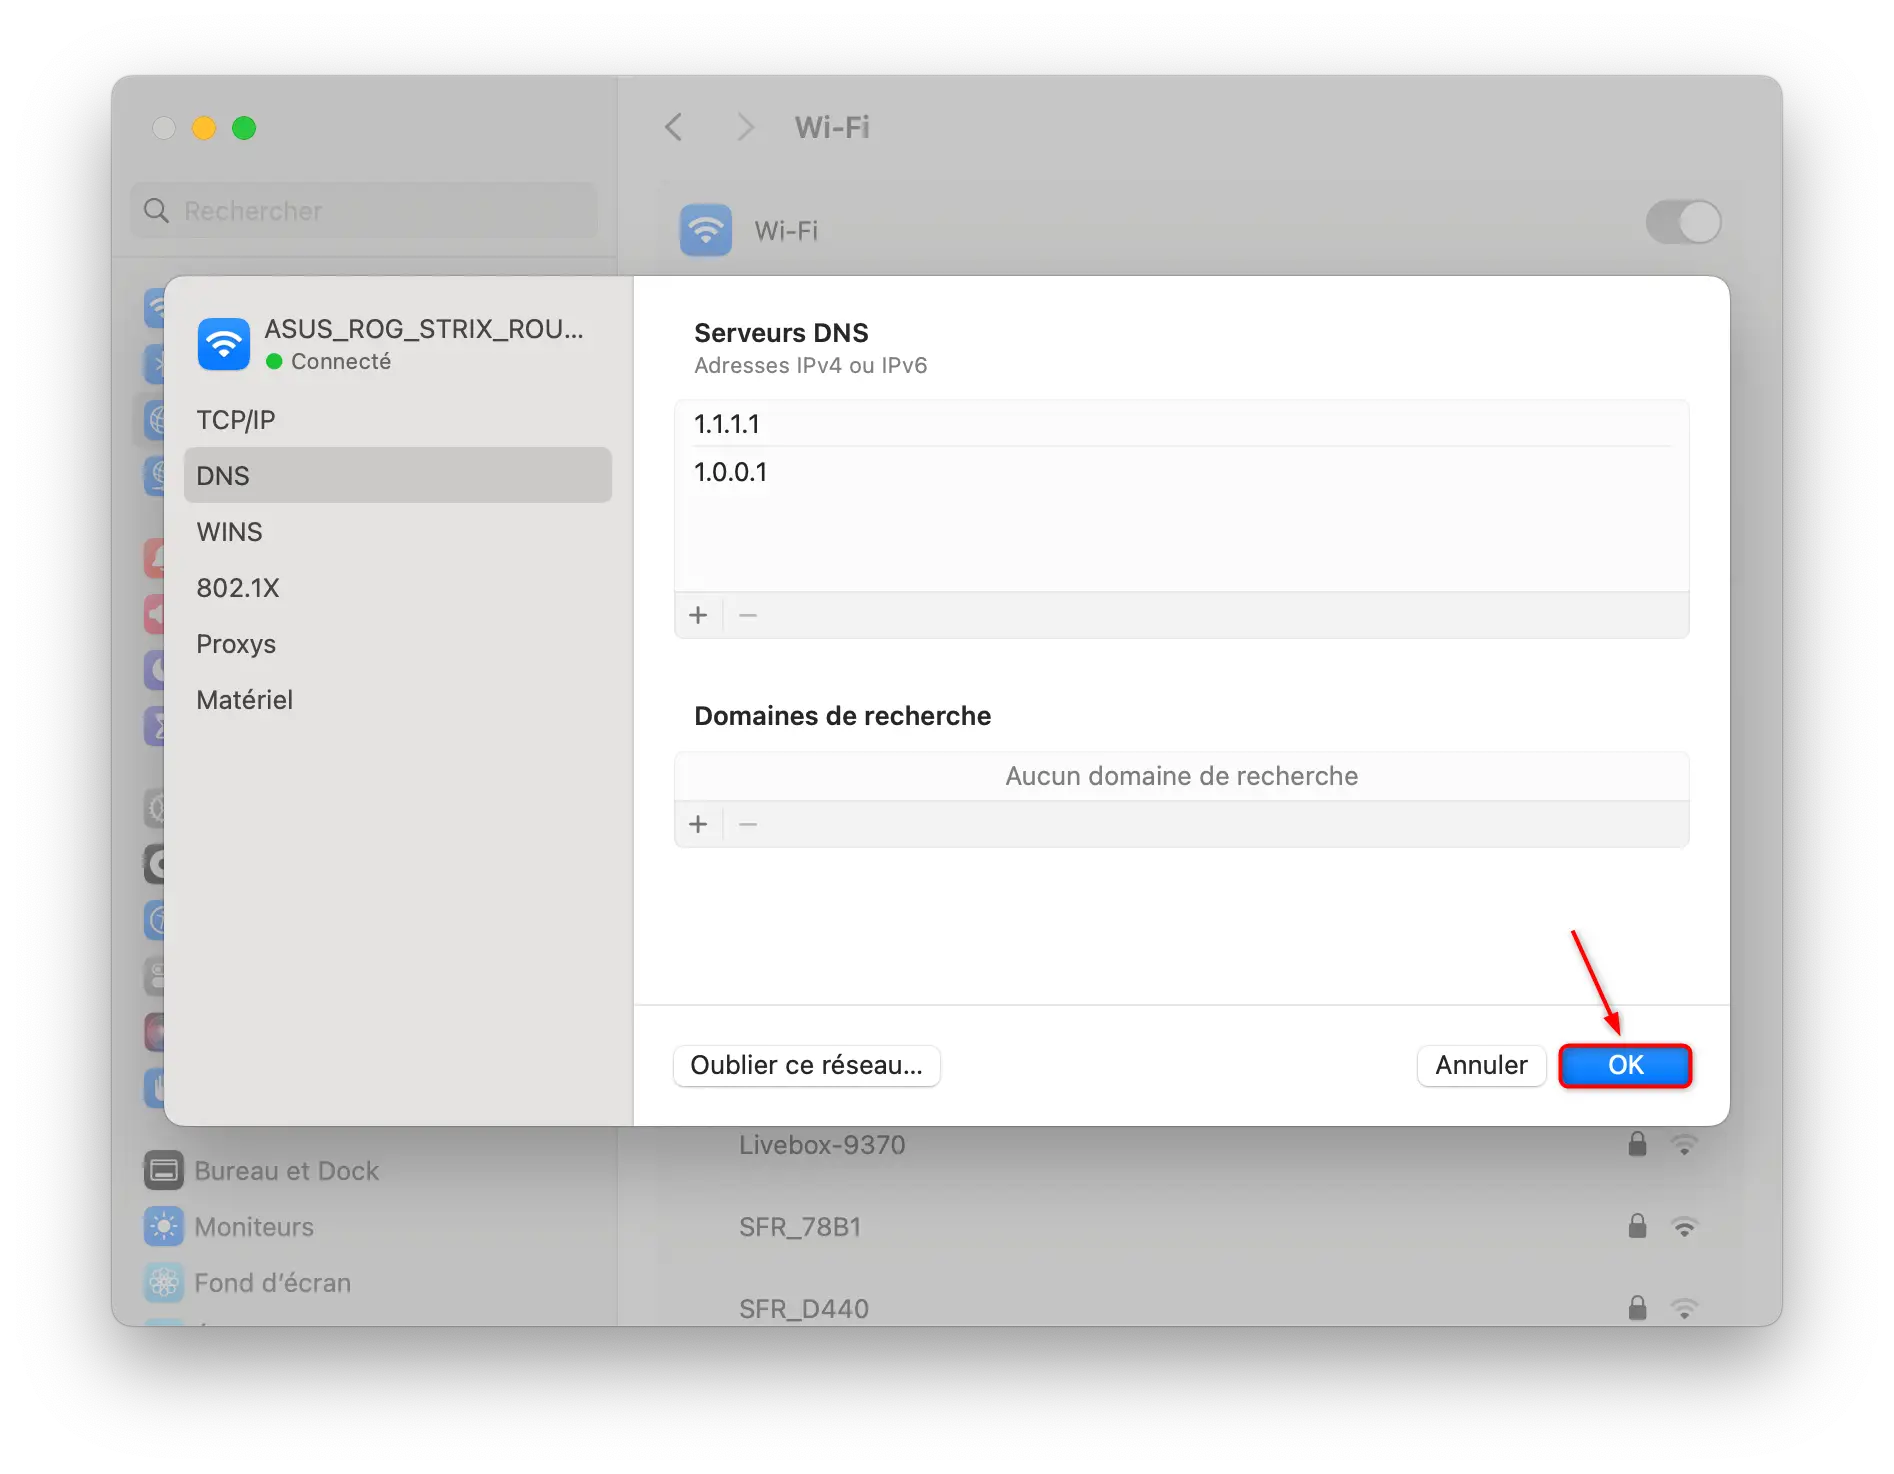
✅ Congratulations, you just changed the DNS on your Mac.
Change DNS in GNU/Linux
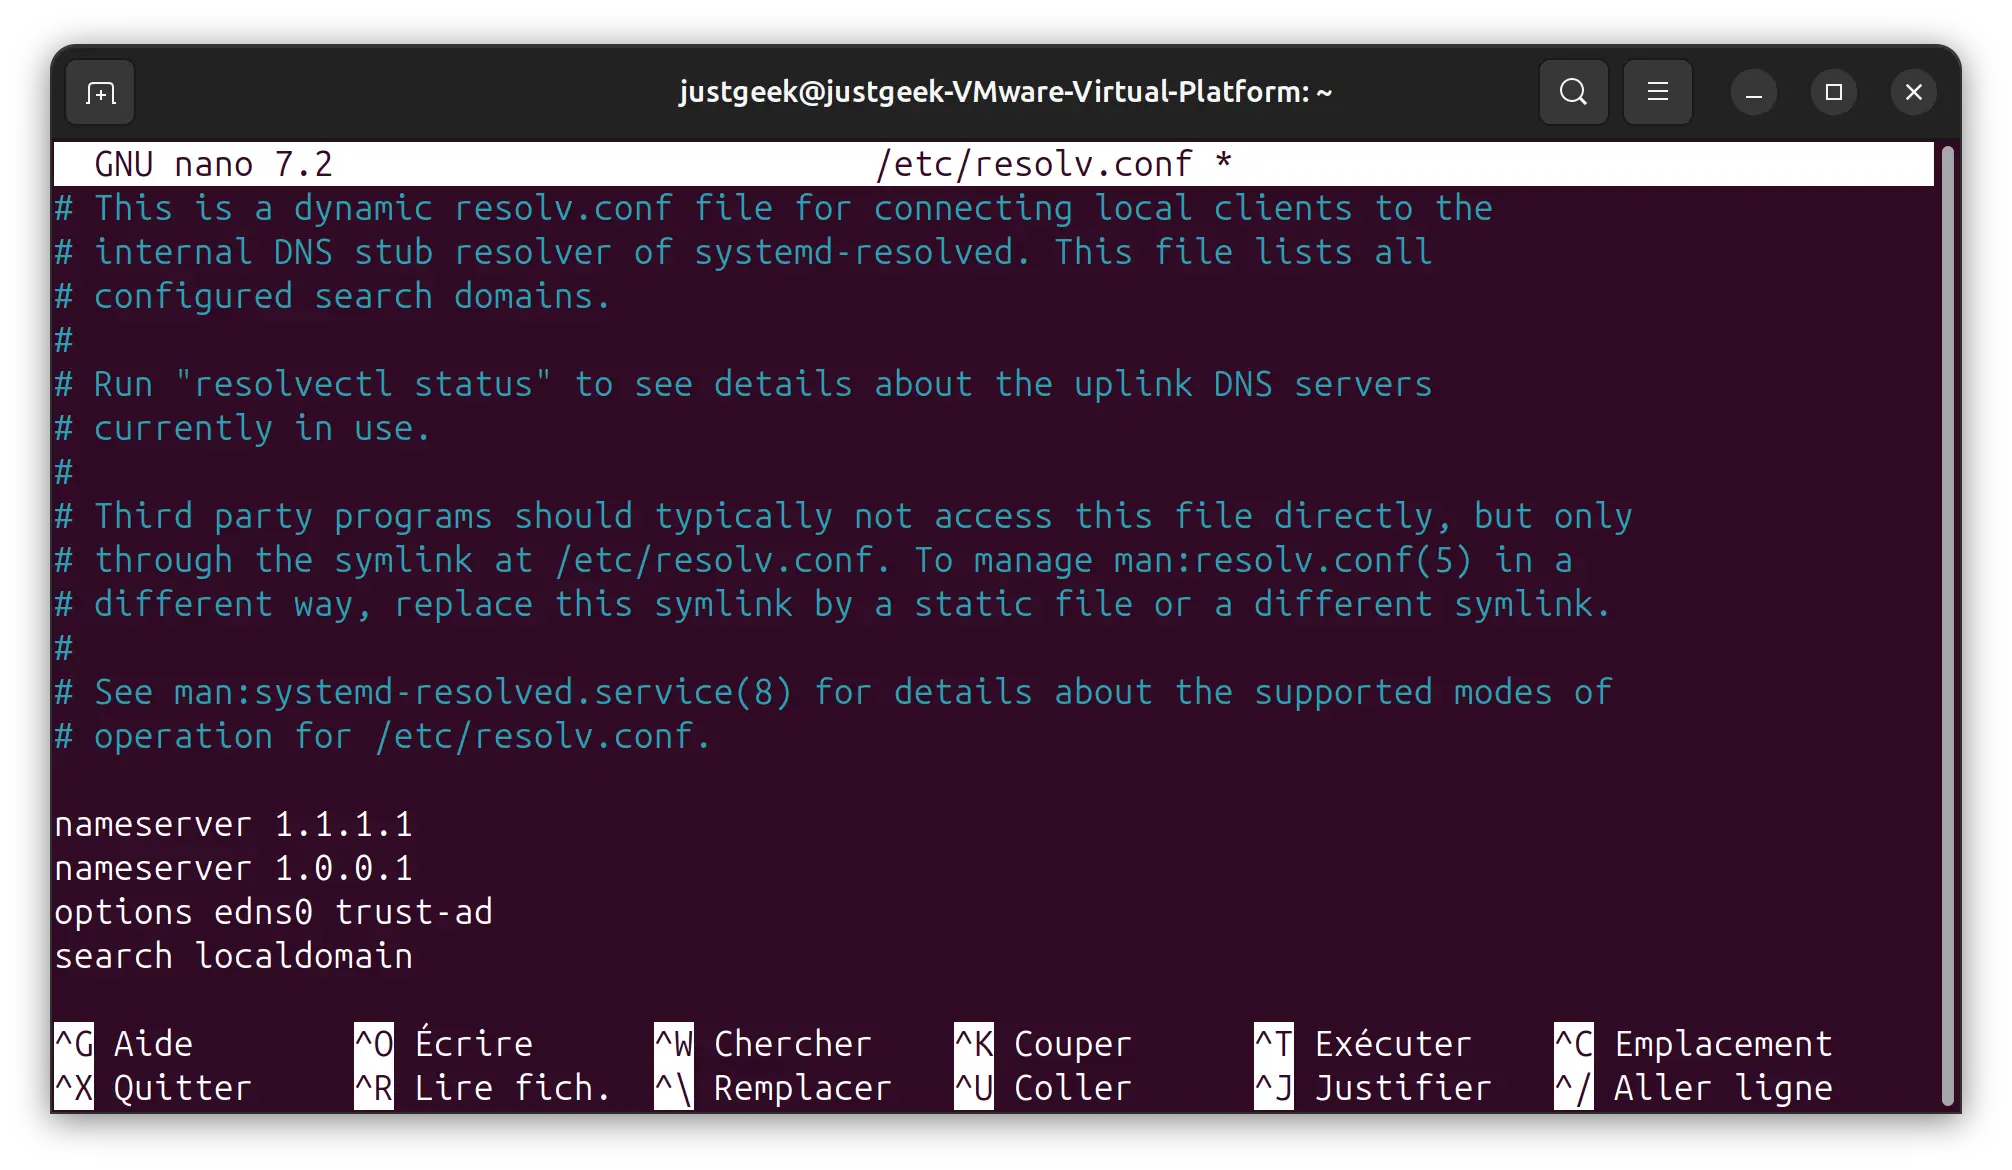
For Linux users, DNS settings may be different depending on the distribution used. Typically, they are configured in the /etc/resolv.conf file.
- Open a terminaltype the following command and enter your administrator password:
sudo nano /etc/resolv.conf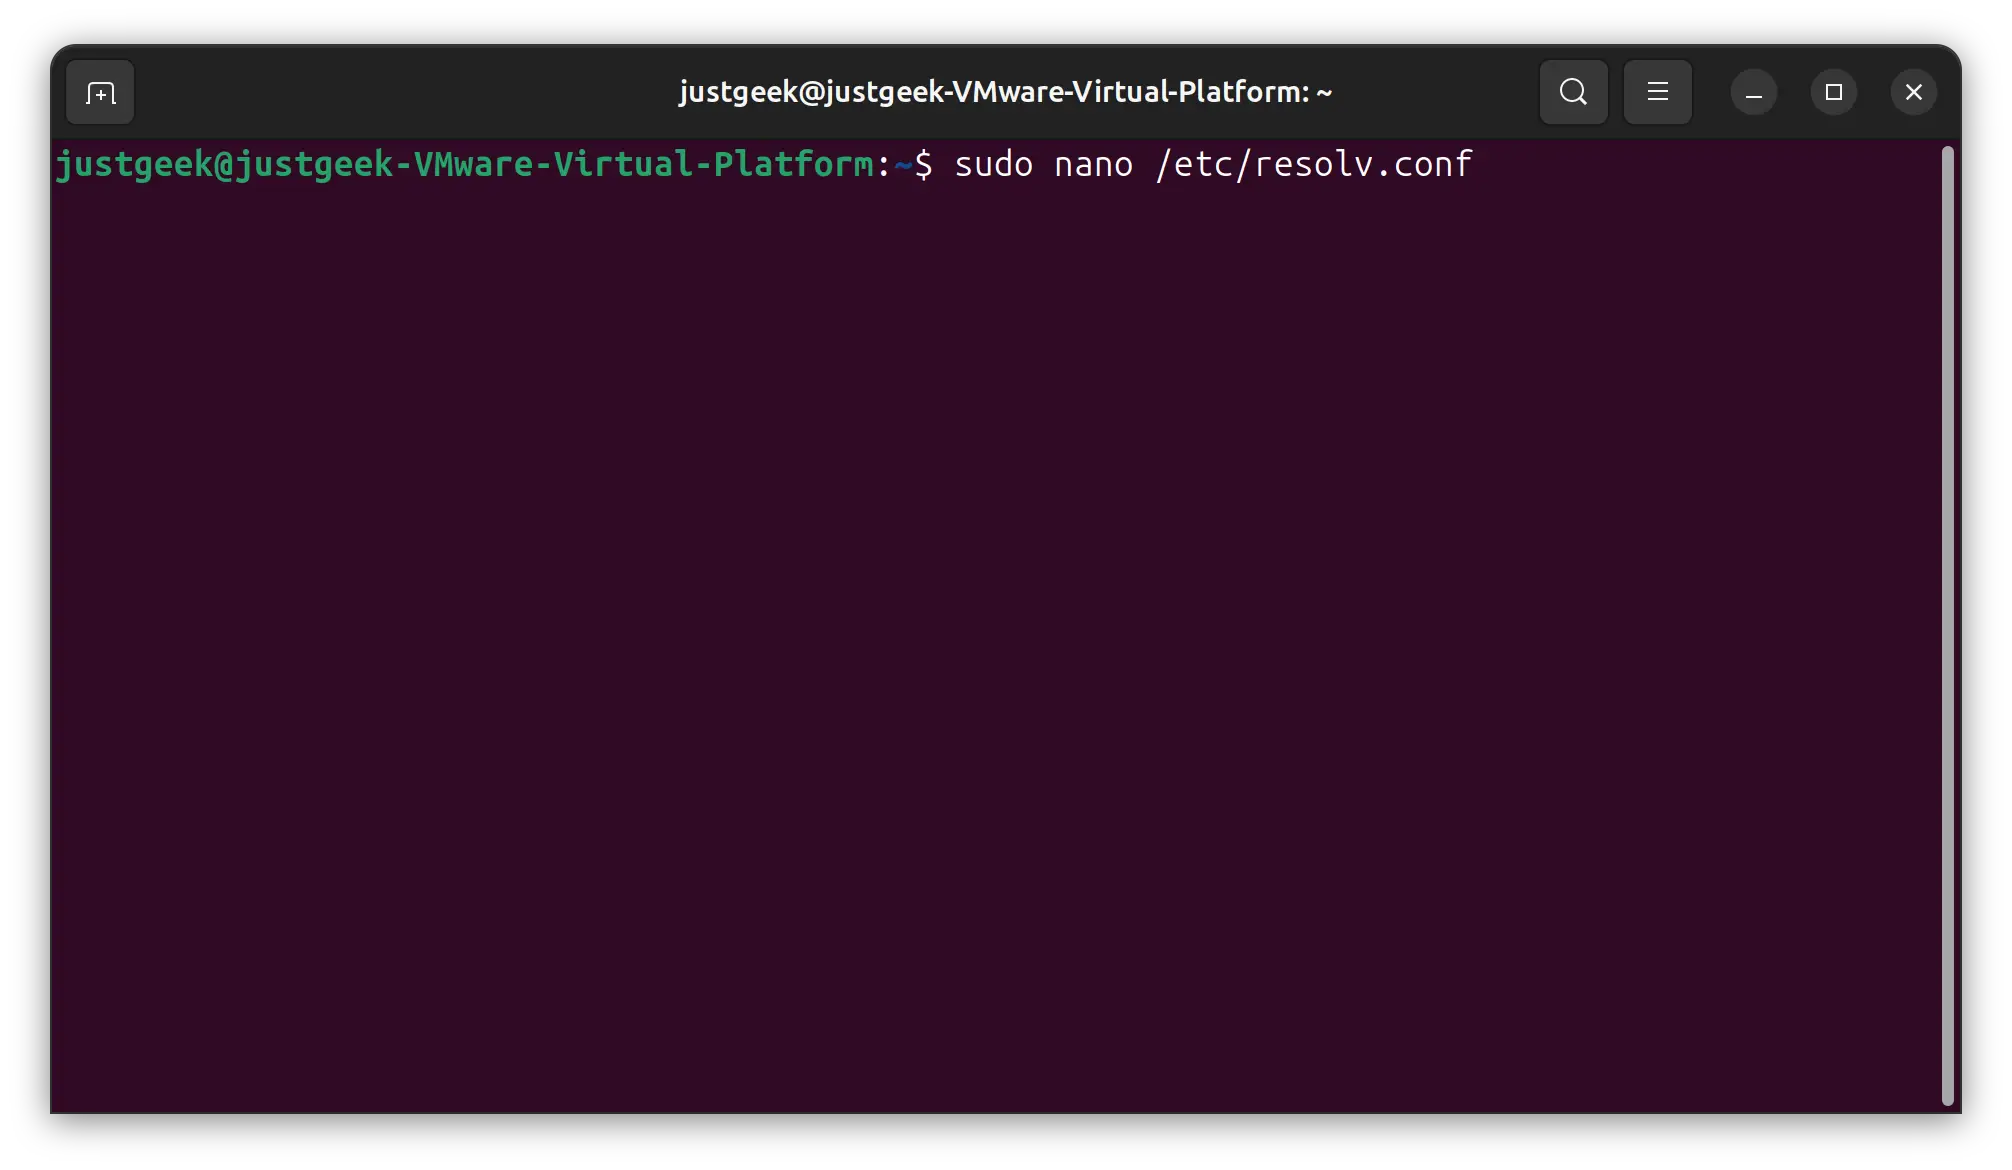
- Enter the new DNS addresses like this:
nameserver 1.1.1.1
nameserver 1.0.0.1
📝 Note : Of course, replace the addresses 1.1.1.1 and 1.0.0.1 with the DNS servers of your choice.
- To save your changes, use the keyboard shortcut. CONTROL + oh and press Entrance.
- Finally, exit with the keyboard shortcut. CONTROL + unknown.
Change DNS in Ubuntu
- Gonna ” Settings “, then in ” Grid “.
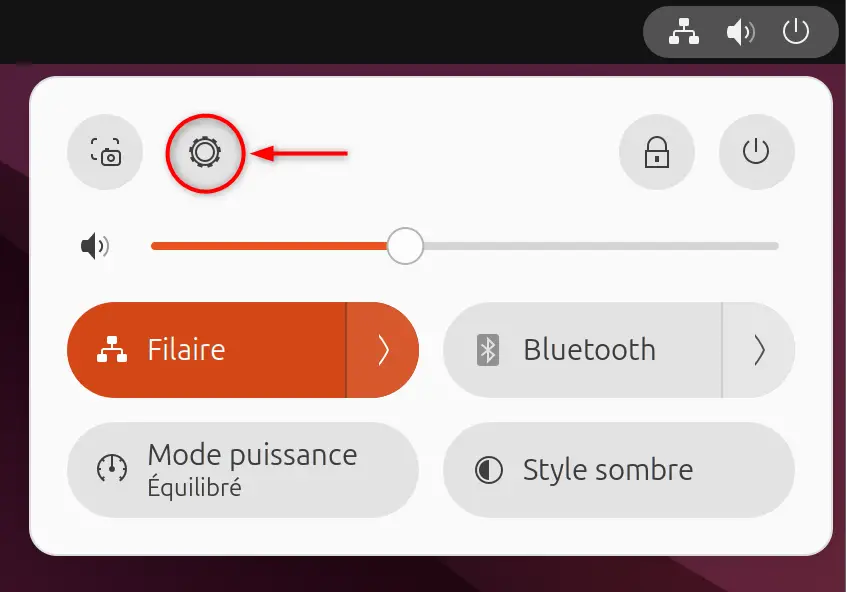
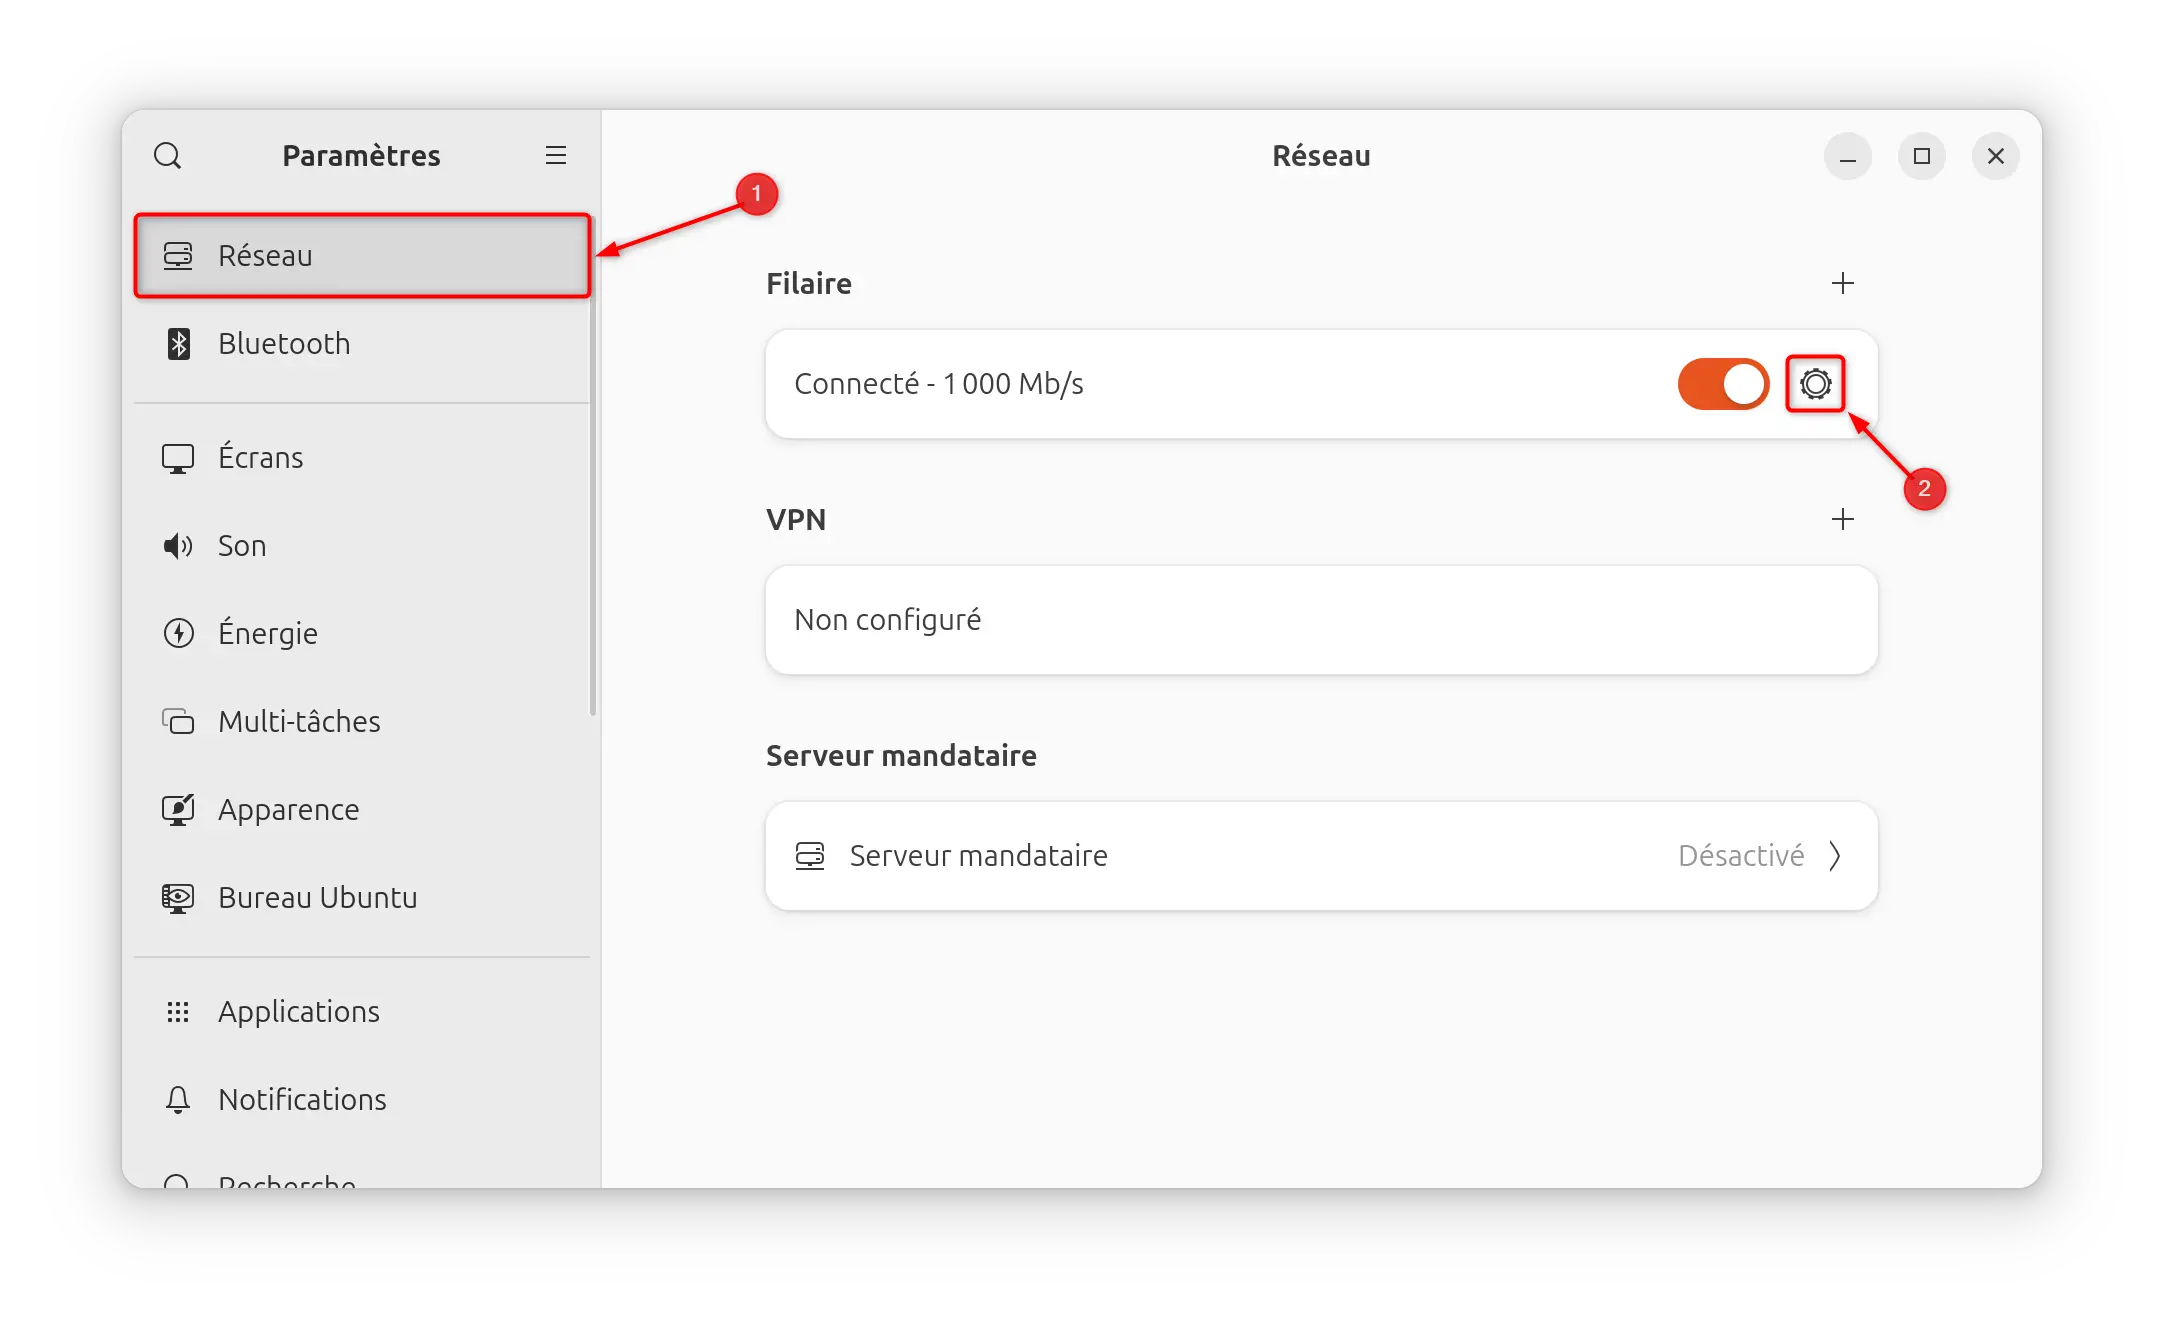
- Choose which connection to modify (cable or Wi-Fi) by clicking on the small gear “ Settings “.
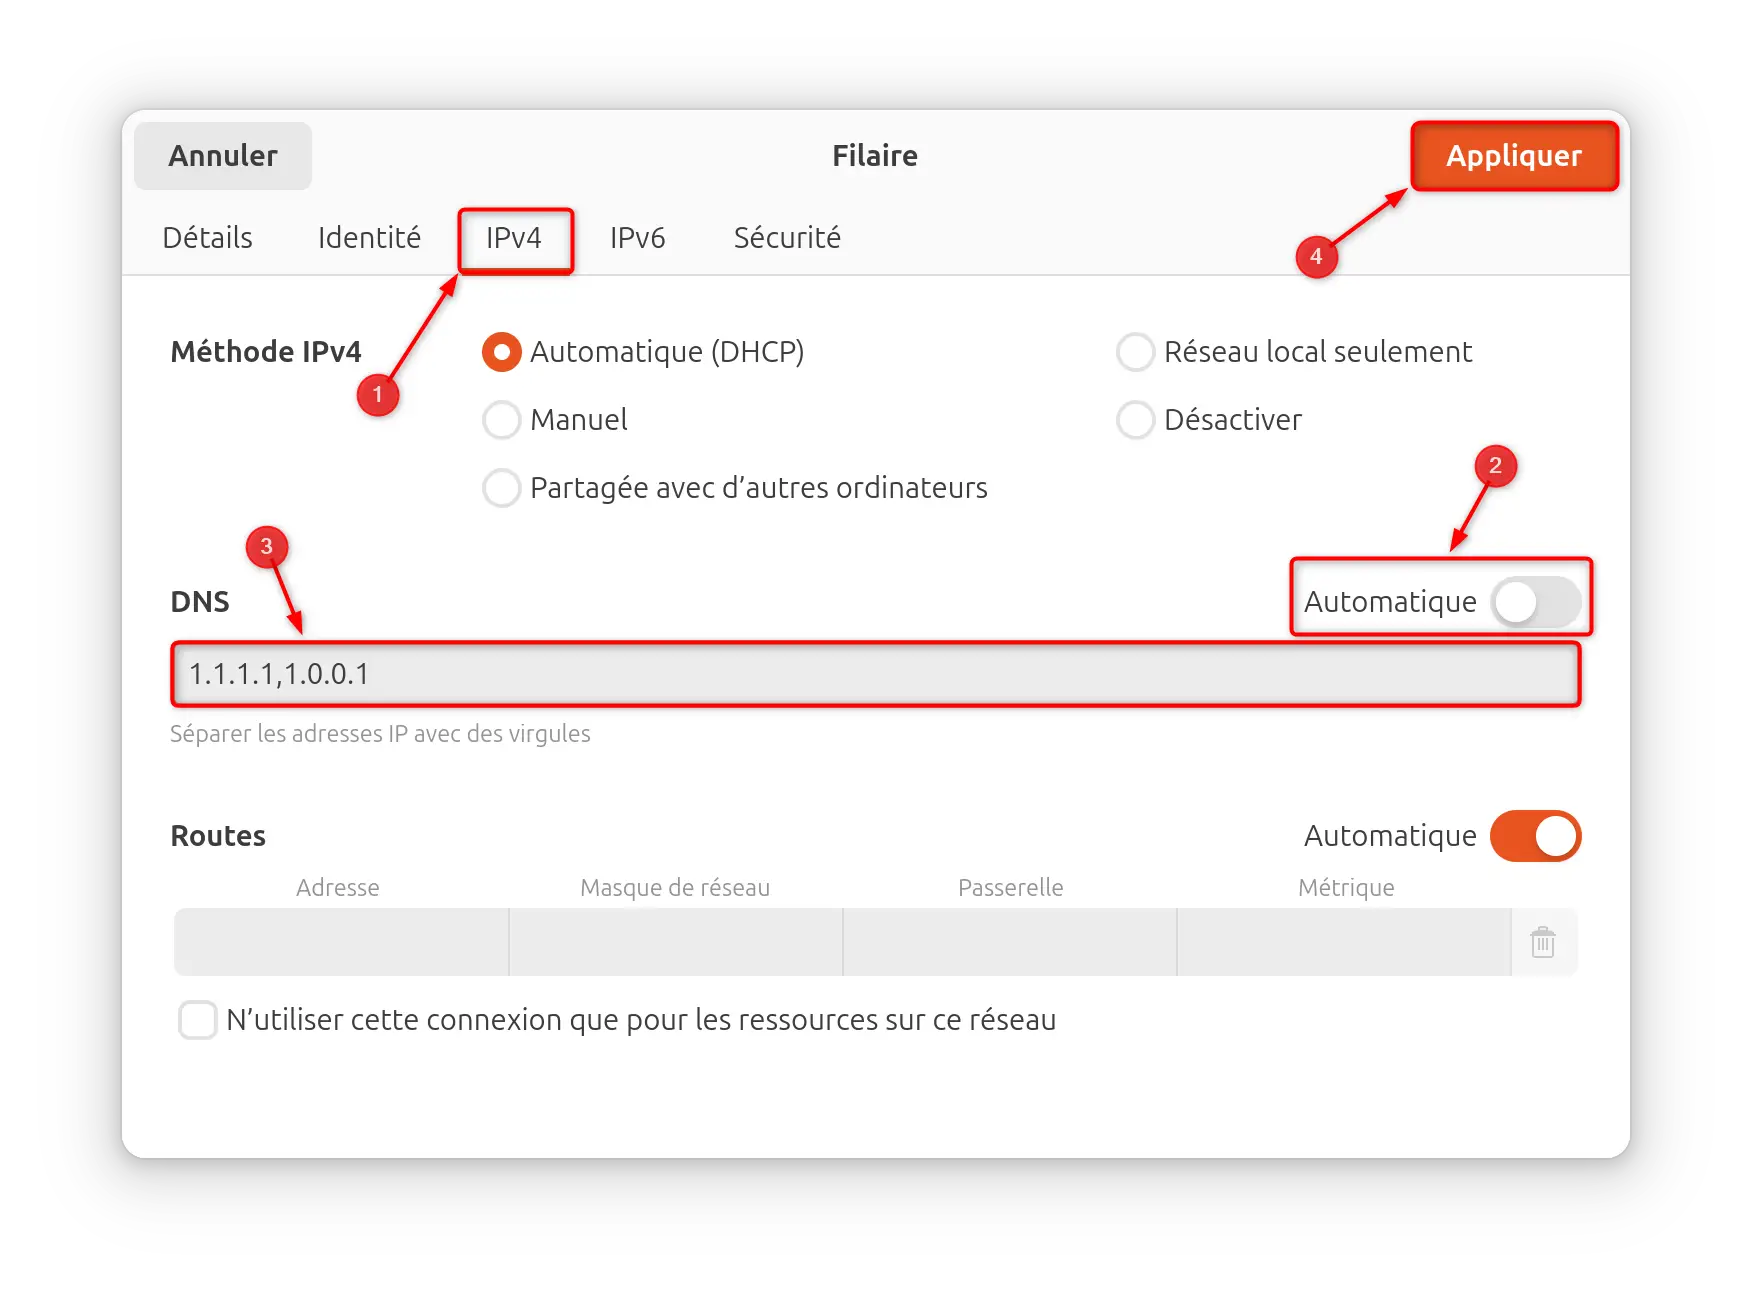
- Click on the ” IPv4 ”, then turn off the “ Automatic “.
- In the section “ DNS », enter the new desired DNS addresses (if there are multiple addresses, place a comma between each address).
- Finally, click “ Apply » to save the changes.
✅ Ready, now you know how to change DNS on your computer. If you have any questions, please don’t hesitate, the forum is here for that 😉
Finally, note that we have also written articles dedicated to changing DNS on Android and iPhone (iOS) smartphones, as well as on the PS5 console. Be sure to check them out for more information on how to change your DNS on these platforms. By using this technique, you will be able to improve your browsing experience and access content that may be blocked in your region.